
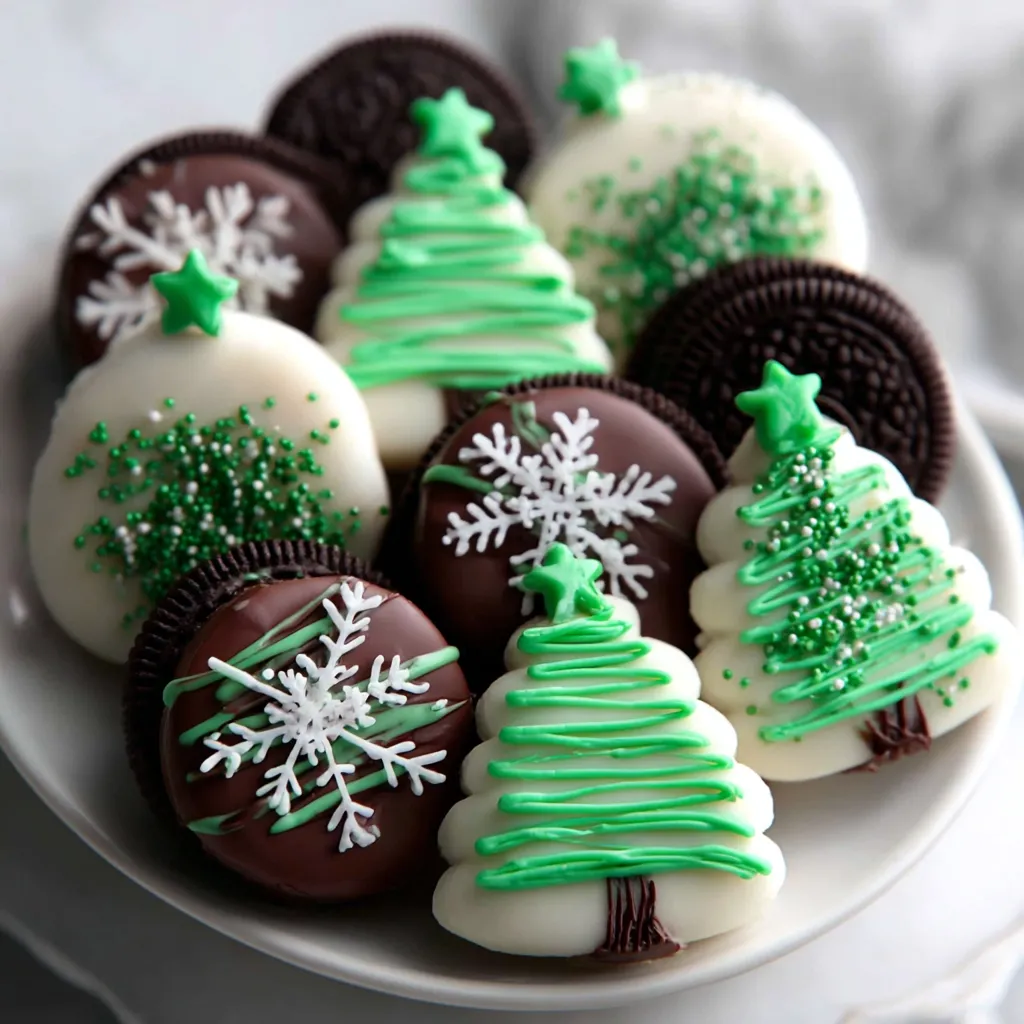
Christmas Oreo Tree Cookies

Festive Oreo cookies decorated as miniature Christmas trees — an easy, no-bake holiday treat that kids and adults will love.
Why You'll Love This Recipe
- Easy and quick: most of the work is melting and piping, with the whole batch ready in about 30 minutes from start to finish, perfect for last-minute entertaining.
- Minimal equipment: you only need a microwave-safe bowl, parchment paper, and a piping bag or zip-top bag — no oven or advanced tools required.
- Kid-friendly decorating: children can help pipe the trees, place stars, and add trunks, making it a fun family activity that doubles as holiday craft time.
- Uses pantry staples: Oreo cookies and melting wafers are widely available year-round; the recipe adapts to what you have on hand and requires only a few decorative elements.
- Make-ahead and giftable: these set completely and keep well in an airtight container for several days, or wrap small stacks as edible gifts for neighbors and teachers.
- Customizable appearance: swap green wafers for colored sprinkles, use dark coating for contrast, or add edible glitter for a party-ready finish.
In my experience these cookies consistently earn compliments and disappear quickly at gatherings. My eldest likes to pipe dramatic, towering trees while my youngest prefers little fluffy shapes; both look charming. Over the years I learned small tricks — like cutting a tiny corner from the piping bag for precise lines — that make decorating faster and more consistent.
Ingredients
- Oreos: Use 15 standard sandwich cookies. Original Oreos provide a crisp crunch and reliable size; double-stuffed can be used for a taller profile but will have more cream to anchor the coating.
- White melting chips (6 oz): Choose microwave-safe coating wafers or confectionery coating for glossy results that set firm. Brands like Merckens or Wilton work well and give a smooth finish that accepts piping.
- Green melting wafers (3 oz): Look for candy melts formulated for decorating. Bright forest green yields a classic tree color; adjust shade for pastel or jewel-toned trees.
- Candy star toppers (15): Small edible stars or sugar decorations provide a festive finishing touch; pick uniform size so each cookie looks cohesive.
- Chocolate jimmies (1/4 cup, optional): These tiny rod-shaped sprinkles mimic tree trunks when applied under the green piping. If you prefer, use a small dot of melted brown coating instead.
Instructions
Prepare the work surface: Line a baking pan with parchment paper and set aside. This prevents sticking and makes cleanup easy. Arrange cookies in a single layer so you can work through melting and dipping without crowding the tray. Melt the white coating: Place 6 ounces of white melting chips in a microwave-safe bowl. Heat on high for 30 seconds, then stir briskly. Continue heating in 10 to 15-second bursts and stirring between intervals until completely smooth. Avoid overheating: if it looks grainy, stop and stir until the residual heat smooths it out. Dip the cookies: Holding each Oreo by its edge, dip it halfway into the melted white coating so the top half is covered. Allow excess to drip back into the bowl and then place the cookie on the parchment-lined pan. Work quickly while the coating is warm but not runny to get a neat semicircle that will become your decorating canvas. Melt the green coating: In a separate clean microwave-safe bowl melt 3 ounces of green melting wafers using the same short-burst method: 30 seconds, stir, then 10 to 15 seconds until smooth. If the green is too thick for piping, add a small drop of vegetable oil to loosen it slightly, but add sparingly to avoid a greasy finish. Pipe the tree shapes: Transfer the green coating to a piping bag or a zip-top bag with a very small corner snipped off. Using a steady back-and-forth motion, draw a tree silhouette on the white-coated half of each cookie. Start with a short line at the top and gradually expand with wider zigzags to the base for layered branches. Aim for 10 to 20 seconds of piping per cookie; if the coating begins to set in the bag, reheat briefly in the microwave for 5 to 10 seconds and stir. Add toppers and trunks: Place a candy star gently at the peak of each green tree while the coating is still wet so it adheres. For the trunk, press a few chocolate jimmies vertically at the base of the green tree or pipe a small brown dot. If you skipped jimmies, use a dab of melted brown coating to form a trunk. Allow to set: Let the decorated cookies sit at room temperature until the coating is fully firm, about 15 to 30 minutes depending on ambient temperature. For quicker setting, place the pan in the refrigerator for 8 to 10 minutes, but avoid leaving them too long to prevent condensation when returned to room temperature.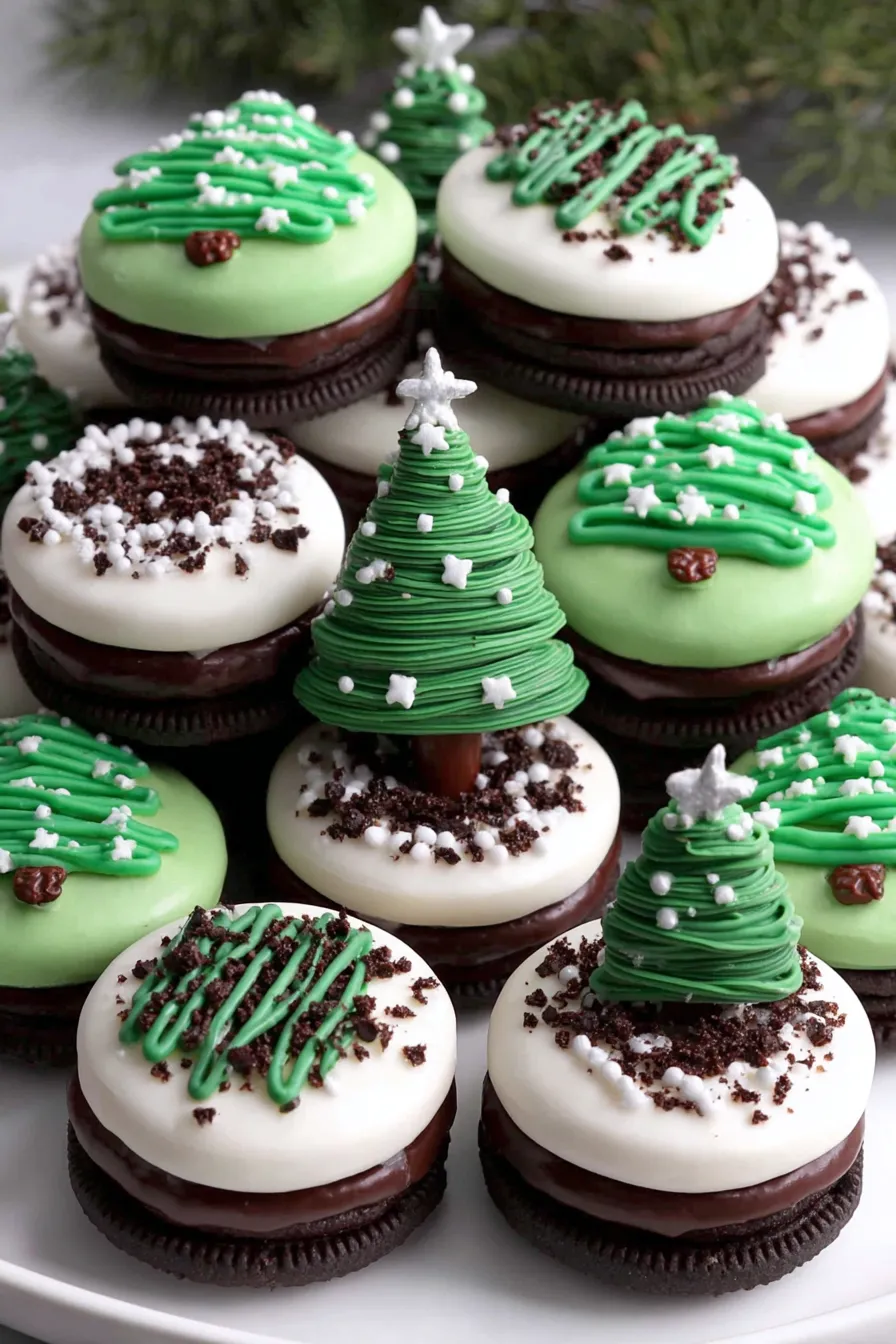
You Must Know
- Storage: keep cooled cookies in an airtight container at room temperature for up to 5 days, or refrigerate for up to 10 days; for longer storage, freeze for up to 3 months.
- Setting: use a refrigerator only for short periods to speed setting; avoid temperature swings to prevent bloom or condensation on the coating.
- Make-ahead: you can dip the cookies in white coating a day ahead and pipe the green trees the next day for faster holiday assembly.
- Allergens: these contain wheat, soy, and milk from common commercial ingredients; check packaging if serving guests with allergies.
My favorite aspect is how adaptable this technique is: bright green for classic trees, mint green for a modern palette, or even colored ombré layers for a show-stopping platter. Family members always argue over who gets the tallest tree, and children beam with pride at placing the star. The process is as much about making memories as it is about the final treat.

Storage Tips
Store the cookies in a single layer or separated by parchment to avoid smudging the decorations. At room temperature in an airtight container they remain crisp for about five days. For longer storage, place cookies in freezer-safe containers in a single layer and freeze up to three months — thaw at room temperature for 10 to 15 minutes before serving. If humidity is high, refrigerate briefly to keep the coating firm, but allow cookies to return to room temperature before plating to avoid condensation dulling the sheen.
Ingredient Substitutions
If you can’t find green melting wafers, color white candy melts with oil-based food coloring sparingly; water-based color may seize the coating. For a dairy-free option, seek out vegan sandwich cookies and dairy-free coating wafers; results may vary in texture. Swap candy stars for gold dragees or small M&M pieces; for trunks, use a thin pretzel stick or pipe melted brown coating. Using dark chocolate for the base rather than white creates a striking contrast and reduces visible imperfections from piping.
Serving Suggestions
Arrange the cookies on a tiered platter or rim a large serving board with evergreen sprigs for a festive presentation. Serve alongside mulled cider, hot chocolate, or coffee for holiday parties. They also pair well with a simple cheese board for adult gatherings where the sweet treats act as dessert bites. For gift-giving, stack in sets of three wrapped in clear cello and tied with ribbon.
Cultural Background
Decorative holiday cookies are a universal tradition; these tree-shaped cookies borrow the Christmas tree symbol common in many Western celebrations. Using store-bought sandwich cookies as a canvas is a modern shortcut that fits the fast-paced holiday season. Transforming familiar sweets into themed treats is a long-standing practice in home celebrations — it’s more about creativity and communal activity than culinary complexity.
Seasonal Adaptations
For a winter wedding or New Year’s party, use silver and gold edible pearls and pale green coatings for an elegant look. For a children’s craft table, provide multiple color wafers and small candies for decorating so each guest can build their own tree. In summer, adapt the concept by piping palm trees with brown trunks and green fronds for a tropical twist.
Meal Prep Tips
Double the recipe and store half in the freezer for spontaneous hostess gifts. Dip all cookies in white coating first and let them set on separate trays; when ready to serve, do a quick piping session, add stars, and you’re done. Keep a small bowl of warm coating handy to reheat and touch up any decorations that lose shape after storage.
These Christmas Oreo Tree Cookies are a wonderful mix of simplicity and charm. They’re quick to make, endlessly customizable, and instantly festive — perfect for family activities, classroom treats, or a crowd-pleasing platter at holiday gatherings. I hope they become a joyful part of your celebrations.
Pro Tips
Use short microwave bursts and stir between them to prevent overheating and achieve a smooth coating.
Cut a tiny corner of a zip-top bag for precise piping before filling; reheating for 5–10 seconds will loosen set coating in the bag.
Pipe on a steady, continuous motion, building layers from top to bottom to create balanced tree shapes.
Work on one step at a time: dip all cookies first, then pipe trees to keep the workflow efficient.
If the green coating is too thick, add one drop of vegetable oil at a time to reach piping consistency.
This nourishing christmas oreo tree cookies recipe is sure to be a staple in your kitchen. Enjoy every moist, high protein slice — it is perfect for breakfast or as a wholesome snack any time.
FAQs about Recipes
How long does it take for the coating to set?
Allow the coating to set at room temperature for 15 to 30 minutes or place in the refrigerator for 8 to 10 minutes to speed setting.
Can I make these dairy-free or vegan?
Yes — use vegan sandwich cookies and dairy-free coating wafers. Results may vary in texture and shine.
Can I freeze the decorated cookies?
Yes, freeze in single layers in an airtight container for up to 3 months. Thaw at room temperature before serving.
Tags
Christmas Oreo Tree Cookies
This Christmas Oreo Tree Cookies recipe makes perfectly juicy, tender, and flavorful steak every time! Serve with potatoes and a side salad for an unforgettable dinner in under 30 minutes.
Ingredients
Cookies
Chocolate and decorations
Instructions
Prepare the pan
Line a baking pan with parchment paper and arrange cookies in a single layer to prevent sticking during decorating.
Melt white coating
Place 6 ounces of white melting chips in a microwave-safe bowl. Heat 30 seconds, stir, and repeat in short bursts until smooth. Avoid overheating to prevent graininess.
Dip cookies
Dip each Oreo halfway into the melted white coating, letting excess drip back into the bowl before placing on parchment. Work quickly to maintain a neat semicircle.
Melt green coating
Melt 3 ounces of green melting wafers in a separate bowl using short microwave bursts and stirring until smooth. If needed, add a tiny amount of vegetable oil to loosen for piping.
Pipe tree shapes
Transfer green coating to a piping bag or zip-top bag with a small corner cut. Pipe back-and-forth triangular shapes starting narrow at the top and widening toward the base for layered branches.
Add toppers and trunks
Place a candy star at the tip of each piped tree while coating is wet. Press chocolate jimmies vertically at the base to form trunks or pipe a brown dot using melted brown coating.
Set and serve
Let cookies set at room temperature for 15 to 30 minutes or refrigerate briefly for faster setting. Serve once coating is fully firm.
Last Step: Please leave a rating and comment letting us know how you liked this recipe! This helps our business to thrive and continue providing free, high-quality recipes for you.
Nutrition
Did You Make This?
Leave a comment & rating below or tag
@gusteen on social media!
Categories:
You might also like...

Fudgy Mississippi Mud Brownies
Ultra-fudgy brownies crowned with melty marshmallows and a glossy cocoa icing. A nostalgic crowd-pleaser that slices cleanly and disappears fast.

Buttery Pecan Pie Bars
Buttery shortbread crust meets gooey brown-sugar pecan filling in these quick, crowd-pleasing bars, prepped in just 10 minutes.

No-Crack Pumpkin Cheesecake
Ultra-smooth pumpkin cheesecake with warm spice, sturdy graham crust, and a foolproof, crack-free bake. Perfect with caramel and whipped cream.
Did You Make This?
Leave a comment & rating below or tag @gusteen on social media!
Rate This Recipe
Share This Recipe
Enjoyed this recipe? Share it with friends and family, and don't forget to leave a review!
Comments (1)
This recipe looks amazing! Can't wait to try it.
Comments are stored locally in your browser. Server comments are displayed alongside your local comments.

Hi, I'm Charlotte!
What's Popular

30-Minute Meals!
Join to receive our email series which contains a round-up of some of our quick and easy family favorite recipes.