
>>

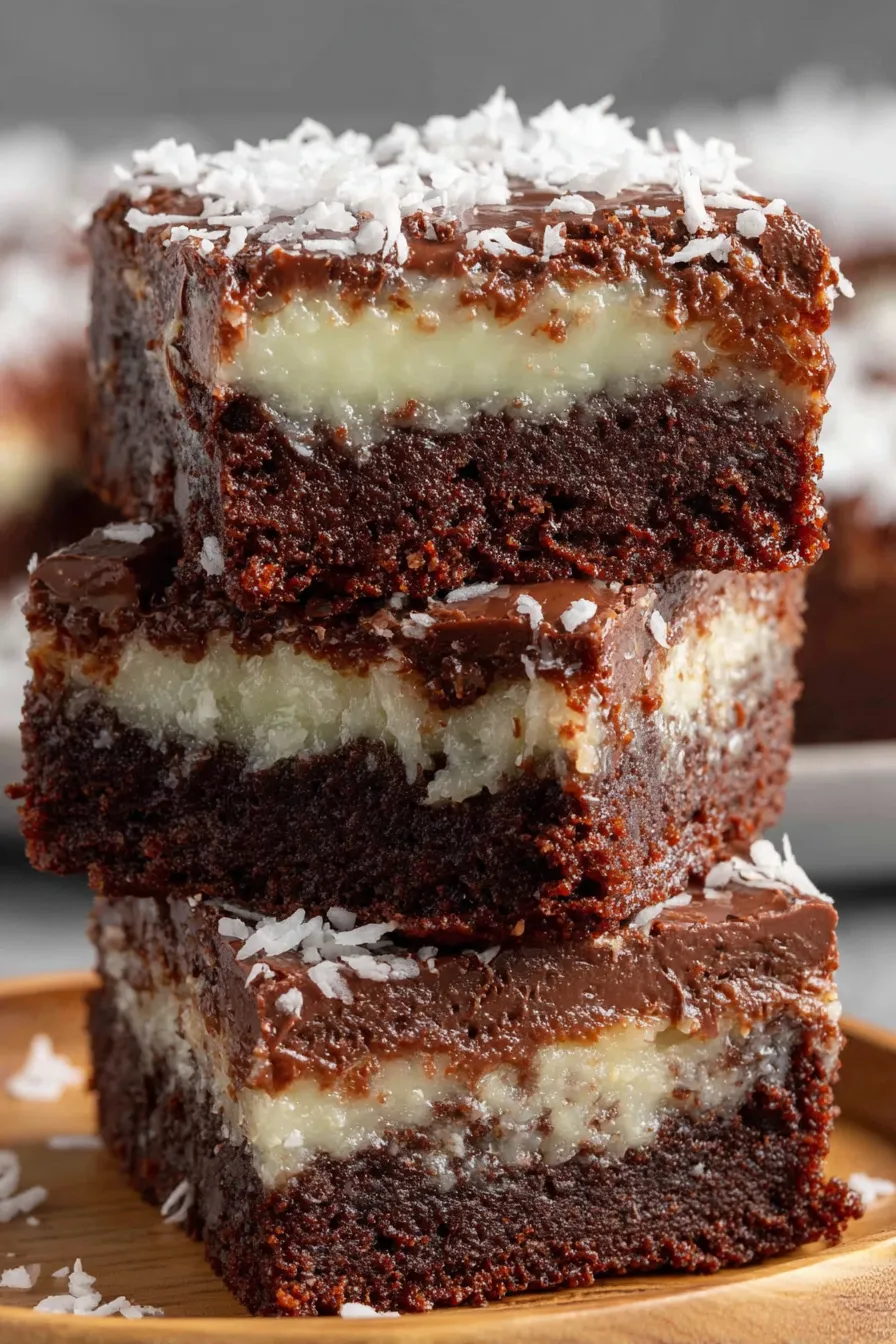
Fudgy chocolate brownies layered with a sweet coconut filling and baked to a chewy, caramelized perfection — a nostalgic treat that combines two favorite desserts.
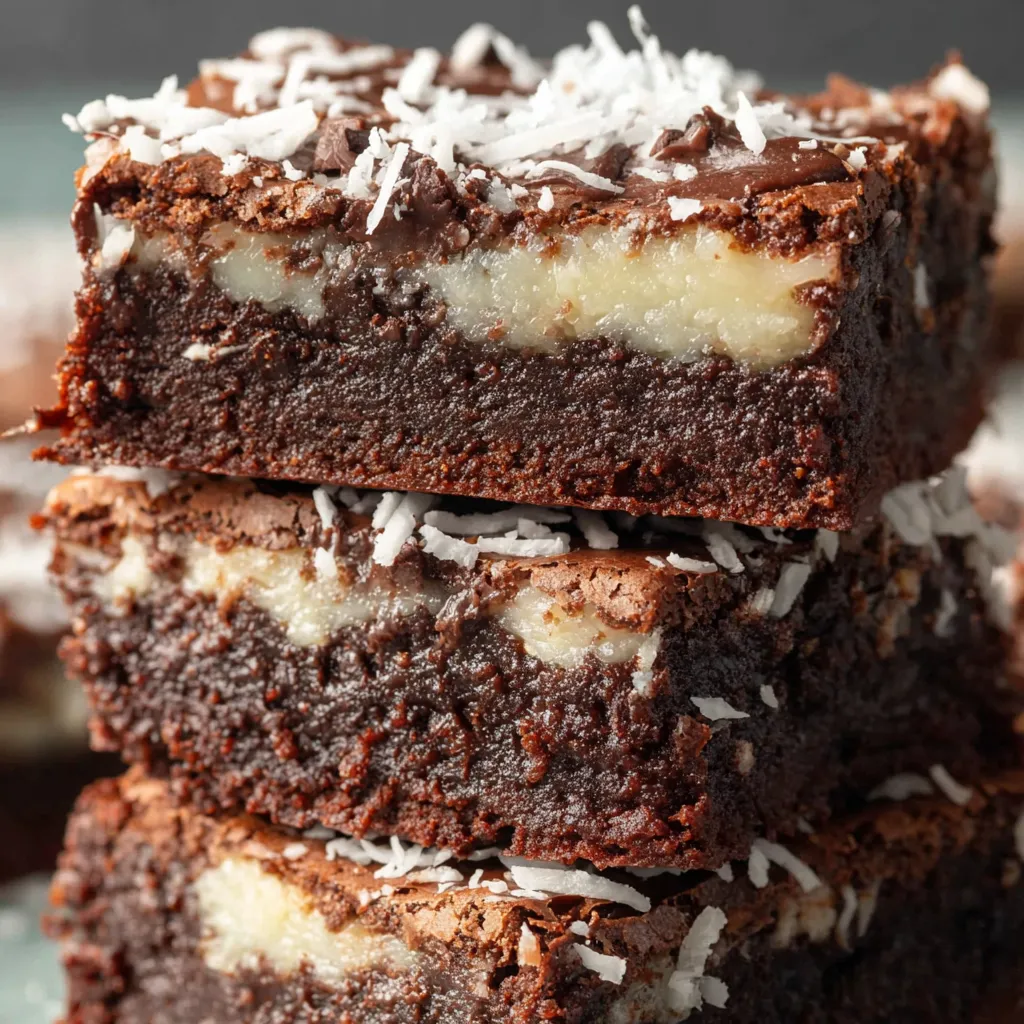
This batch of coconut brownies started as an experiment one rainy afternoon when I wanted something both familiar and a little tropical. I grew up with dense, fudgy brownies and the sweet, chewy texture of coconut bars; this recipe married the two into a single tray that immediately became a holiday favorite. The contrast between the rich chocolate layers and the gooey coconut center is what makes these so memorable: a crisp top, a tender interior, and that sticky, caramel-like coconut ribbon in the middle.
I discovered this combination years ago while riffing on recipes from a worn family cookbook and a bakery bar I loved as a child. After a few test bakes, adjusting sugar and cooking time, I landed on a method that gives reliably even layers and a clean slice. These squares are perfect for potlucks, after-school snacks, or as a small celebration dessert — they travel well and keep their texture for days when stored correctly.
Our family tested these on a dreary Sunday and everyone went back for seconds; the kids loved the gooey middle and the adults appreciated how the chocolate didn’t overpower the coconut. Over time I’ve learned small tweaks — like tossing chips in a teaspoon of flour so they don’t sink — that make the results consistent every bake.
What I love most is how reliably these please a crowd — they were the first item to disappear at a family picnic last summer. Watching adults debate whether the coconut or chocolate layer is better is a small joy; kids love the chew and adults love the nostalgia. Over time I’ve learned to err on the side of slightly underbaking for maximum chewiness, and that chilling before slicing yields the cleanest squares.
Store fully cooled squares in an airtight container layered with parchment to prevent sticking. At room temperature they remain tender and chewy for 48 hours; refrigerate for up to 5 days to firm the filling and keep the top from becoming sticky in humid climates. For longer storage, freeze cooled squares individually wrapped and placed in a freezer-safe bag for up to 3 months. Reheat gently at 300°F for 5–8 minutes or microwave briefly (10–15 seconds) to revive the fudgy texture — avoid overheating which can dry the chocolate layer.
If you prefer less sweetness, reduce the granulated sugar to 1 1/4 cups and use unsweetened coconut flakes with 1/4 cup honey or maple syrup to bind the filling; expect a less sticky center. For a nuttier profile, swap half the chocolate chips for chopped dark chocolate or add 1/2 cup toasted chopped pecans to the coconut filling. Gluten-free flour blends can replace all-purpose flour cup-for-cup if they contain xanthan gum; baking times may vary slightly. To make them dairy-free, choose a dairy-free butter and coconut condensed milk alternatives, but note the texture will be slightly different.

Serve these bars slightly warmed with a scoop of vanilla ice cream for an indulgent dessert, or dust the tops with a little cocoa powder and flaked coconut for a more refined presentation. They pair beautifully with coffee or a bright citrus tea to cut through the sweetness. For parties, arrange on a platter with fresh berries and mint leaves to add color and a fresh contrast. Cut into smaller squares for bite-sized finger foods at brunch or afternoon tea.
Brownies are a classic American invention from the early 20th century, prized for their fudgy texture and portability. Coconut bars and coconut-based confections appear throughout many culinary traditions, from Caribbean desserts to European coconut macaroons. The combination of chocolate and coconut nods to tropical flavors while staying rooted in the comfort-food tradition of dense chocolate bars. Regional variations include toasted coconut, added nuts, or a drizzle of dulce de leche on top to echo Latin American sweets.
In summer, lighten the filling with unsweetened coconut and a splash of lime zest for a brighter bar; in winter, fold in a pinch of ground cinnamon and espresso powder for a warming spice profile. For holiday tables, press a few toasted almond slices into the top layer before baking for a festive crunch. These bars also adapt well to pumpkin season — swirl 1/2 cup pumpkin purée into the coconut filling with complementary spices for a hybrid dessert.
You can prepare the batter and coconut filling a day ahead and keep them covered in the refrigerator; assemble and bake the following day. Alternatively, bake the full tray and slice when cooled, portioning into individual containers for grab-and-go snacks. For lunchbox treats, wrap each square in parchment and place in an insulated container; they hold up well and remain pleasantly chewy through the afternoon. Label and date frozen portions for easy rotation.
These coconut brownies are one of those recipes that encourage sharing: they’re simple enough for a novice, flexible enough for a confident baker to tweak, and reliably beloved by a crowd. I hope you enjoy them as much as my family does — they always spark a few stories at the table and a request for the recipe.
Toss chocolate chips with a teaspoon of flour before folding into batter to prevent sinking.
Allow the bars to cool completely before slicing to get clean edges and avoid a gooey collapse.
Use room-temperature eggs for a smooth emulsion and glossy, fudgy texture.
If the top browns too quickly, tent with foil for the last 10 minutes of baking to prevent over-browning.
Chill the baked pan for 30–60 minutes before slicing for neater squares.
This nourishing coconut brownies recipe is sure to be a staple in your kitchen. Enjoy every moist, high protein slice — it is perfect for breakfast or as a wholesome snack any time.
This Coconut Brownies recipe makes perfectly juicy, tender, and flavorful steak every time! Serve with potatoes and a side salad for an unforgettable dinner in under 30 minutes.
Preheat oven to 350°F. Line an 8×8-inch baking dish with parchment paper and spray lightly with nonstick spray so the bars lift out easily after cooling.
Whisk together 1 cup all-purpose flour, 1/2 cup cocoa powder, and 1/4 teaspoon salt in a medium bowl until evenly mixed and lump-free.
In a small bowl stir the 1/2 cup mini chocolate chips with 1 teaspoon flour to coat; this helps prevent them from sinking during baking.
Whisk melted and cooled 3/4 cup butter with 1 1/2 cups granulated sugar until slightly glossy. Add 2 eggs and 2 teaspoons vanilla and whisk until smooth.
Stir the dry mixture into the wet with a wooden spoon just until combined, then fold in the floured chocolate chips gently for even distribution.
Spread half of the brownie batter evenly in the prepared pan using an offset spatula to create a smooth base for the coconut filling.
In a small bowl mix 2 1/2 cups sweetened coconut flakes, 2/3 cup sweetened condensed milk, 1 teaspoon vanilla, and 1/4 teaspoon salt until cohesive and spreadable.
Spread the coconut filling evenly over the bottom layer, then gently dollop and smooth the remaining batter over the coconut to form the top layer.
Bake at 350°F for 35–40 minutes until the top is set with a slight jiggle in the center. Cool completely in the pan before slicing into 16 squares.
Last Step: Please leave a rating and comment letting us know how you liked this recipe! This helps our business to thrive and continue providing free, high-quality recipes for you.
Leave a comment & rating below or tag
@gusteen on social media!

Ultra-fudgy brownies crowned with melty marshmallows and a glossy cocoa icing. A nostalgic crowd-pleaser that slices cleanly and disappears fast.

Buttery shortbread crust meets gooey brown-sugar pecan filling in these quick, crowd-pleasing bars, prepped in just 10 minutes.

Ultra-smooth pumpkin cheesecake with warm spice, sturdy graham crust, and a foolproof, crack-free bake. Perfect with caramel and whipped cream.
Leave a comment & rating below or tag @gusteen on social media!
Enjoyed this recipe? Share it with friends and family, and don't forget to leave a review!
This recipe looks amazing! Can't wait to try it.
Comments are stored locally in your browser. Server comments are displayed alongside your local comments.

Join to receive our email series which contains a round-up of some of our quick and easy family favorite recipes.
