
No-Bake Chocolate Chip Cookie Dough Brownie Bombs

Decadent no-bake brownie sandwiches filled with edible cookie dough, dipped in chocolate — a crowd-pleasing, make-ahead treat perfect for parties and gift-giving.

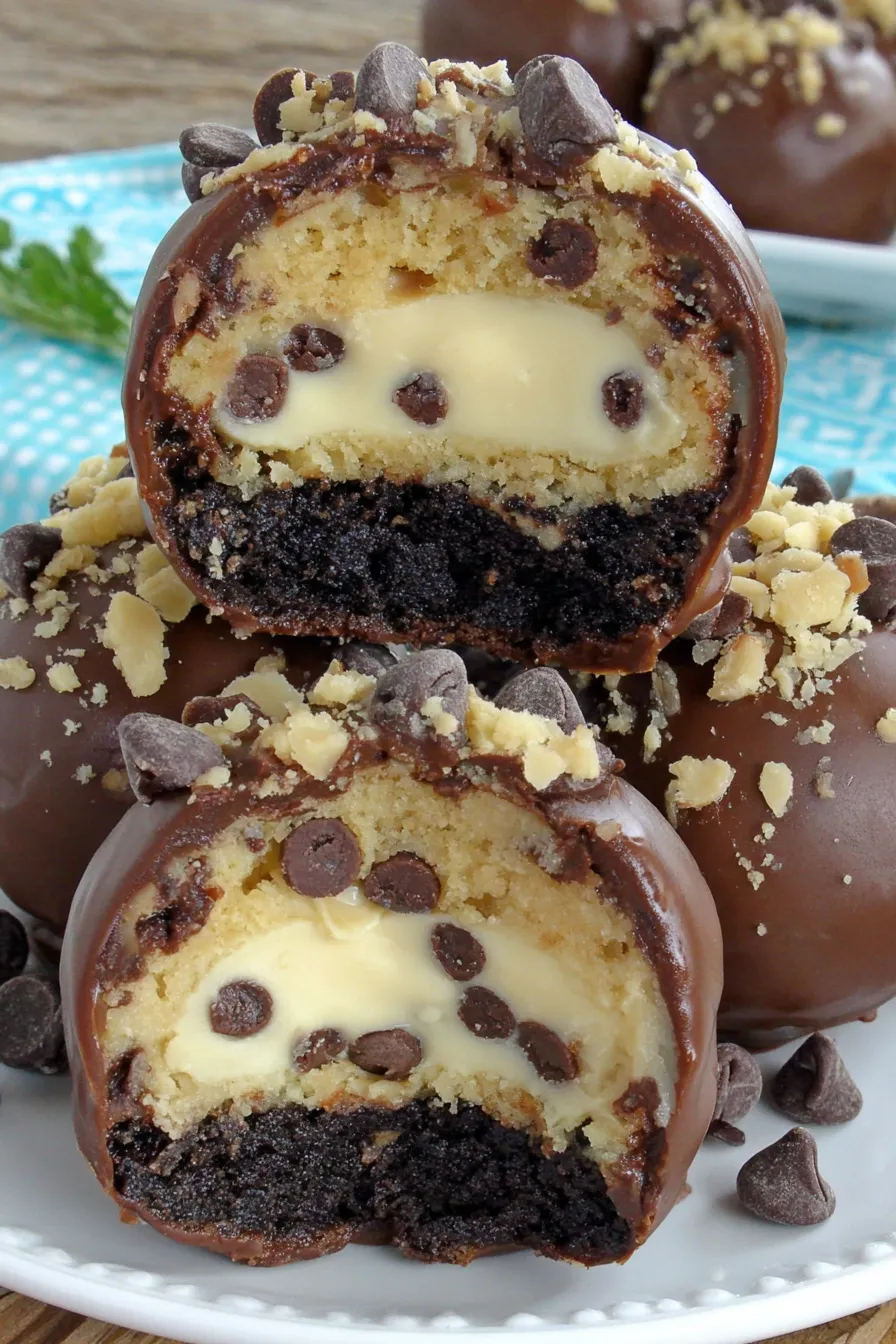
This playful no-bake treat blends two irresistible classics into one: fudgy brownie bites sandwiched around edible cookie dough, dipped in a glossy chocolate coating. I first assembled these on a rainy afternoon when I wanted something impressive but fuss-free for a neighborhood potluck. The idea of using ready-made brownie bites from the bakery cut the work in half, and the result was a tray of bite-sized delights that disappeared within minutes.
What makes these special is the contrast in textures — the dense, chewy brownie gives a satisfying base while the soft, buttery cookie dough center brings a familiar, nostalgic bite. Coating each sandwich in melted chocolate locks everything together and gives a professional finish, yet the process is simple enough to involve kids or to turn into a relaxed baking-day activity. Store them chilled or freeze them for a quick sweet fix on demand.
Why You'll Love This Recipe
- Ready in under an hour from start to finish when you use bakery brownie bites — perfect for last-minute gatherings or unexpected guests.
- Uses pantry staples like all-purpose flour, brown sugar, and butter and a single melting chocolate block, so you don’t need specialty ingredients.
- Make-ahead friendly: freeze the assembled sandwiches and dip them later, or finish dipping and store in the fridge for easy serving.
- Crowd-pleasing and portable — great for potlucks, school events, or packaged as edible gifts during the holidays.
- Customizable: swap mini chips for nuts, sprinkles, or flavor extracts to create unique flavor profiles without changing the technique.
My family’s response was immediate — a chorus of “more, please” and requests to pack some for friends. I discovered that children love helping to sandwich the dough between brownie bites, while adults appreciate the adult-level chocolate finish. The recipe has become my go-to when I want a striking dessert that doesn’t require an oven or complicated timing.
Ingredients
- Prepared fudge brownie bites: Purchase about 42 small brownie bites (3 packages, bakery section) — choose dense, fudge-style bites rather than cakey varieties for the best contrast with the soft dough. I like store-brand or supermarket bakery fudge brownies that hold up when sandwiched.
- Chocolate CandiQuik: 1 1/2 packages — this melts smoothly and sets with a glossy finish. Alternatively, use couverture or compound chocolate designed for dipping.
- Butter: 3/4 cup softened (1 1/2 sticks) — room temperature butter produces a creamy, spreadable dough; do not use melted butter.
- Brown sugar: 3/4 cup packed — adds moisture and caramel notes to the center.
- Granulated sugar: 1/4 cup — balances sweetness and helps structure the dough.
- Vanilla extract: 1 tablespoon — use pure vanilla for depth of flavor.
- Milk: 2 teaspoons — just enough to make the dough tender; you can use whole milk for richness.
- All-purpose flour: 2 cups — this recipe uses heat-treated or heat-processed flour to make the dough safe to eat raw, or you can use heat-treated flour from the store. If using regular flour, toast it in a 350°F oven for 5–7 minutes to reduce risk.
- Salt: Pinch — enhances the chocolate and brown sugar notes.
- Mini chocolate chips: 1 1/2 cups divided — stir 1 cup into the dough and reserve 1/2 cup for garnish.
Instructions
Make the Dough:In the bowl of a stand mixer fitted with the paddle attachment, cream together 3/4 cup softened butter, 3/4 cup packed brown sugar, and 1/4 cup granulated sugar on medium speed for about 2 minutes until light and creamy. Scrape the bowl, then add 2 teaspoons milk and 1 tablespoon vanilla; beat until incorporated. Add the pinch of salt and 2 cups all-purpose flour gradually, beating on low until a soft, nonsticky dough forms. Stir in 1 cup mini chocolate chips with a spatula. If your flour hasn’t been heat-treated, toast it first on a baking sheet at 350°F for 5–7 minutes and cool.Assemble Sandwiches:Working on a foil-lined baking sheet, place a fudgy brownie bite flat-side down. Use a rounded tablespoon of cookie dough and place it on the brownie. Top with another brownie bite to form a sandwich, pressing gently so the dough spreads slightly to the edges without squeezing out. Repeat until you have about 20–21 sandwiches. Space them evenly on the sheet so they don’t stick when frozen.Freeze to Firm:Place the baking sheet in the freezer for 30 minutes to 1 hour, or until the sandwiches are firm to the touch. This step ensures the chocolate coating adheres evenly and prevents the centers from melting during dipping.Melt the Coating:Melt 1 1/2 packages of Chocolate CandiQuik according to package directions until completely smooth. Use a microwave in short bursts, stirring between intervals, or a double boiler set over simmering water. Avoid overheating — a silky texture makes dipping easier and gives a better set.Dip and Garnish:Using a fork or dipping tool, dunk each frozen sandwich into the melted coating, rolling to cover completely. Tap the fork on the bowl rim to remove excess chocolate and return the coated bomb to the foil-lined sheet. Immediately sprinkle with the remaining 1/2 cup mini chips while the coating is still wet so they adhere.Set and Serve:Allow the chocolate to harden at room temperature, about 20–30 minutes, or chill briefly in the refrigerator to speed setting. Store leftovers in the refrigerator for up to 3 days or in the freezer for up to 1 month; thaw briefly before serving.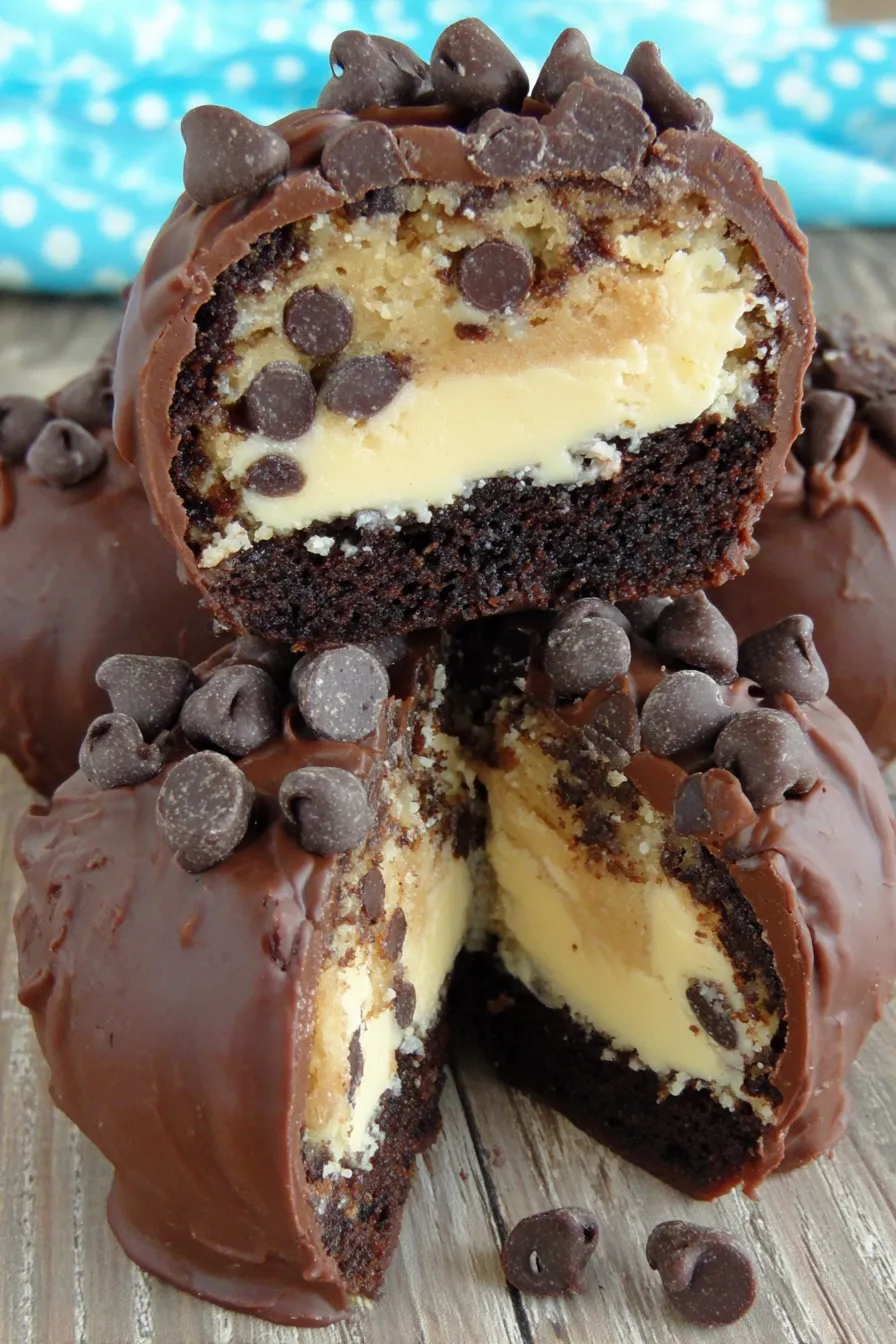
You Must Know
- These hold well in the freezer for about 1 month; thaw in the refrigerator or at room temperature for 10–15 minutes before serving.
- The center uses untreated flour normally found in pantries; to ensure safety, use heat-treated flour or toast your flour before mixing.
- Use fudge-style brownie bites to prevent the sandwich from crumbling — cakier bites will not produce the same texture contrast.
- This is a high-calorie, indulgent treat; keep stored in an airtight container and enjoy in moderation.
What I love most is how this treat brings people together. I’ve taken trays to birthday parties, school events, and holiday gatherings — they consistently get snapped up first. The process of making them is part celebration and part nostalgia: the edible cookie dough center is a gentle reminder of childhood spoon-licking moments, elevated by the glossy chocolate finish for an adult-worthy presentation.
Storage Tips
Store the finished treats in a shallow airtight container layered with parchment paper to prevent sticking. Keep them refrigerated for up to 3 days for the best texture; if you plan to serve later, freeze them on a tray until solid and then transfer to a freezer-safe container or zip-top bag for up to 1 month. When thawing, move them to the refrigerator for a few hours or sit at room temperature for 10–15 minutes — thawing on the countertop prevents condensation from forming on the chocolate surface. For long-distance gifting, flash-freeze and ship in insulated packaging with cold packs.
Ingredient Substitutions
For a dairy-free version, substitute vegan butter and use a dairy-free chocolate coating designed for melting. If you want to avoid refined sugar, try swapping the sugars with erythritol blends that measure equally; texture will be slightly different. For a gluten-free iteration, replace all-purpose flour in the dough with a 1-to-1 gluten-free flour blend that includes xanthan gum — ensure the blend is safe to eat raw (or heat-treat it first). Swap mini chips for chopped toasted pecans or toffee bits for crunch, but reduce the added sugar if you opt for toffee.
Serving Suggestions
Arrange the bombs on a platter lined with parchment and garnish with a dusting of cocoa powder or a drizzle of white chocolate for contrast. They pair beautifully with a scoop of vanilla ice cream, a mug of hot coffee, or a glass of cold milk. For parties, create a dessert board with varied toppings — crushed pretzels, toasted coconut, and sprinkles allow guests to personalize their bites. These also make charming edible gifts when stacked in a clear box tied with ribbon.
Cultural Background
The idea of combining cookie dough with brownies is a modern American mash-up that draws on the popularity of edible cookie dough and decadent brownie confections. Brownie sandwiches have roots in American bake-sale culture where portability and crowd appeal matter. This combination reflects the growing trend of hybrid desserts that pair complementary textures — soft centers and sturdy exteriors — to create small, shareable treats.
Seasonal Adaptations
For holiday seasons, fold in holiday-colored mini chips or swap vanilla for peppermint extract (use 1/2 teaspoon). In summer, top with a sprinkle of sea salt and serve chilled for a refreshing contrast to warm weather. For back-to-school or fall gatherings, fold in toasted chopped walnuts and a pinch of cinnamon to the dough for warmth and nuttiness.
Meal Prep Tips
Prepare the dough and assemble sandwiches up to the freezing step two days in advance; keep them frozen on a tray and transfer to a container. Melt and dip only when you’re ready to serve to maintain the freshest finish. Use parchment-lined trays and stack layers with parchment between them to prevent sticking. If you’re prepping multiple batches, work in small batches when dipping to ensure the coating stays fluid and glossy.
These bombs are a joyful, simple project that rewards you with a stunning outcome — perfect for sharing or stashing for yourself.
Pro Tips
Chill the assembled sandwiches until firm before dipping to prevent the centers from melting and to get an even coating.
Heat the coating gently and stir frequently to avoid overheating; a smooth, lukewarm melt makes dipping easier and shinier.
Use a rounded tablespoon of dough for uniform bites; pressing too hard will squeeze filling out and make a mess.
If the coating begins to thicken while dipping, reheat in 10-second microwave bursts stirring between intervals.
This nourishing no-bake chocolate chip cookie dough brownie bombs recipe is sure to be a staple in your kitchen. Enjoy every moist, high protein slice — it is perfect for breakfast or as a wholesome snack any time.
FAQs about Recipes
Is it safe to eat the raw cookie dough?
Yes — use heat-treated flour or toast your flour in a 350°F oven for 5–7 minutes to make it safe for raw consumption.
How long will they last?
Store in the refrigerator for up to 3 days or in the freezer for up to 1 month in an airtight container.
Tags
No-Bake Chocolate Chip Cookie Dough Brownie Bombs
This No-Bake Chocolate Chip Cookie Dough Brownie Bombs recipe makes perfectly juicy, tender, and flavorful steak every time! Serve with potatoes and a side salad for an unforgettable dinner in under 30 minutes.
Ingredients
Brownie Bites
Coating
Cookie Dough
Instructions
Cream butter and sugars
In a stand mixer fitted with the paddle, cream 3/4 cup softened butter with 3/4 cup brown sugar and 1/4 cup granulated sugar until light and creamy, about 2 minutes.
Add liquids and flour
Beat in 1 tablespoon vanilla and 2 teaspoons milk, then add a pinch of salt and 2 cups heat-treated flour on low speed until a soft dough forms.
Fold in chips
Stir in 1 cup mini chocolate chips with a spatula until evenly distributed.
Assemble sandwiches
Place a rounded tablespoon of dough on a brownie bite, top with a second brownie bite, press gently, and repeat to make about 20–21 sandwiches on a foil-lined sheet.
Freeze to firm
Freeze the assembled sandwiches for 30 minutes to 1 hour until firm to the touch.
Melt coating
Melt 1 1/2 packages Chocolate CandiQuik according to package directions until smooth, stirring frequently to avoid overheating.
Dip and top
Dunk each frozen sandwich into the melted coating, return to the sheet, and immediately top with remaining mini chips so they adhere.
Set and store
Allow coating to harden at room temperature or chill briefly. Store in the refrigerator up to 3 days or freeze up to 1 month.
Last Step: Please leave a rating and comment letting us know how you liked this recipe! This helps our business to thrive and continue providing free, high-quality recipes for you.
Nutrition
Did You Make This?
Leave a comment & rating below or tag
@gusteen on social media!
Categories:
You might also like...

Fudgy Mississippi Mud Brownies
Ultra-fudgy brownies crowned with melty marshmallows and a glossy cocoa icing. A nostalgic crowd-pleaser that slices cleanly and disappears fast.

Buttery Pecan Pie Bars
Buttery shortbread crust meets gooey brown-sugar pecan filling in these quick, crowd-pleasing bars, prepped in just 10 minutes.

No-Crack Pumpkin Cheesecake
Ultra-smooth pumpkin cheesecake with warm spice, sturdy graham crust, and a foolproof, crack-free bake. Perfect with caramel and whipped cream.
Did You Make This?
Leave a comment & rating below or tag @gusteen on social media!
Rate This Recipe
Share This Recipe
Enjoyed this recipe? Share it with friends and family, and don't forget to leave a review!
Comments (1)
This recipe looks amazing! Can't wait to try it.
Comments are stored locally in your browser. Server comments are displayed alongside your local comments.

Hi, I'm Charlotte!
What's Popular

30-Minute Meals!
Join to receive our email series which contains a round-up of some of our quick and easy family favorite recipes.