
No Bake Monster Truffles (Halloween Oreo Balls)

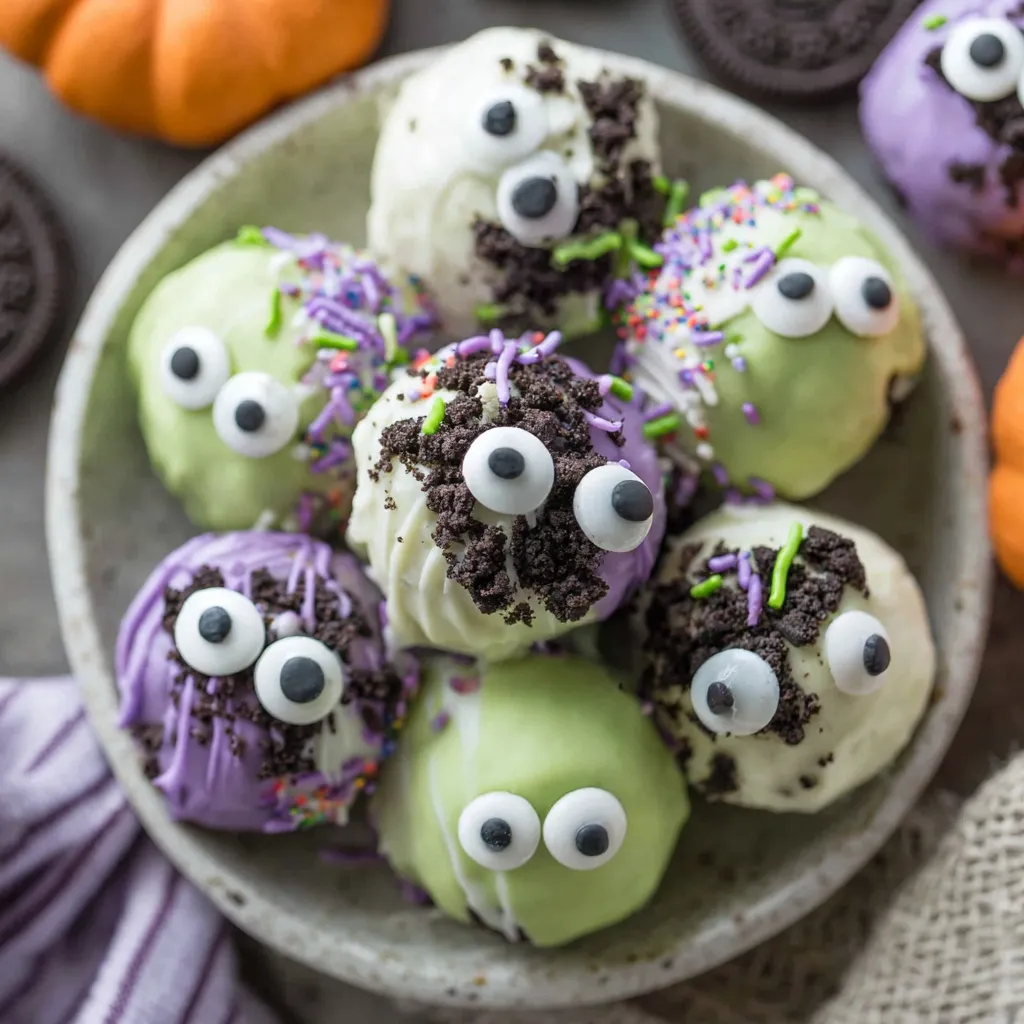
Cute, creepy, and utterly irresistible — these no-bake monster truffles are Oreo cookie balls coated in colored white chocolate, decorated with candy eyes and sprinkles for a perfect Halloween treat.

This batch of no-bake monster truffles is exactly the kind of playful, crowd-pleasing treat I make when I want Halloween guests to smile before they take a bite. I first stumbled on this combination of crushed cookies and cream cheese years ago while prepping for a school bake sale, and the idea of turning them into little monsters came from a late-night craft session with my kids. The result is rich, creamy centers encased in a crisp white-chocolate shell that you color and decorate any way you like. They’re sweet without being cloying, with a smooth, fudgy interior and a satisfying snap when you bite through the colored coating.
What makes these special is how simple they are to execute and how dramatic the final presentation can be. The base is just crushed Oreos and soft cream cheese — a foolproof pairing that yields the same texture every time. Dip them in colored white melting chocolate, add a few candy eyes and seasonal sprinkles, and you have an instant showstopper for parties, school events, or a spooky family dessert. These are also no-bake, which means minimal hands-on heat and a wonderful make-ahead option when the calendar is full of fall activities.
Why You'll Love This Recipe
- Fast and no-bake: ready to assemble in about 30 minutes with chilling time, making them ideal for busy days or last-minute parties.
- Pantry-friendly ingredients: uses standard Oreos, cream cheese, and white melting chocolate — things you can find at most grocery stores.
- Kid-friendly decorating: kids love placing candy eyes and sprinkles, so these double as a fun family activity.
- Make-ahead convenience: centers can be formed and frozen, then dipped later for easy party prep and minimal day-of work.
- Customizable colors and decorations: swap green and purple for any palette to match a theme or holiday.
- Perfect portion size: bite-sized truffles that are easy to serve, transport, and store.
I’ve gifted these on neighborhood trick-or-treat rounds and packed them for school parties — each time they vanished faster than I could snap photos. My sister swears by making a double batch for larger gatherings because the basic dough freezes well and can be dipped later, which makes hosting so much less stressful. The kids insist on picking the eyes and sprinkles, while the adults appreciate how polished these look with almost no fuss.
Ingredients
- Oreos (24 regular): Classic sandwich cookies give structure and deep chocolate flavor. Use the original variety for the best texture; packing or double-stuffed will change moisture and yield. Crushing finely ensures a smooth center.
- Cream cheese (4 ounces), softened: Full-fat cream cheese gives the right richness and binding. Let it sit at room temperature for 20–30 minutes before using for seamless mixing; Philadelphia is a reliable brand.
- White melting chocolate (16 ounces), divided: Use resealable melting wafers or couverture-style chips for a glossy finish. We divide the chocolate so we can color and dip in two different hues.
- Edible candy eyes: Available in most baking aisles; choose medium or small sizes so they look proportional on each truffle.
- Food coloring gel (green and purple): Gel concentrates color without thinning the chocolate; a few drops go a long way.
- Halloween sprinkles: A mix of shapes and colors adds texture and spooky accents. Keep a selection of nonpareils, jimmies, and tiny confetti on hand.
Instructions
Prepare the cookie base: Line a baking sheet with parchment paper. Place 24 whole Oreos in a food processor and pulse until they resemble very fine crumbs. If you don’t have a processor, place cookies in a sealed plastic bag and crush with a rolling pin until sandy. Measure to ensure even texture — no large chunks remain. Incorporate the cream cheese: Add 4 ounces of room-temperature cream cheese to the crumbs and pulse or mix until the mixture comes together into a cohesive dough. Scrape down the bowl and pulse a few more times. The mixture should hold shape when pressed; if it’s too wet, add a teaspoon of extra crushed cookie crumbs. Form the truffles: Using a small ice cream scoop or a 2-tablespoon scoop, portion the mixture into even balls. Roll quickly between your palms to smooth. Place the balls on the prepared baking sheet and freeze for 20 minutes until firm; chilling prevents the centers from falling apart during dipping. Melt and color the first coating: In a microwave-safe bowl, combine 12 ounces of the white melting chocolate and heat in 30-second bursts, stirring between intervals until fully melted and glossy. Add 3–4 drops of green gel coloring and mix until you reach the desired shade. Keep the chocolate warm and fluid but not hot. Dip the chilled balls: Working one at a time, dip each chilled ball into the colored chocolate using a fork or dipping tool. Tap the fork on the edge of the bowl to remove excess coating and return the truffle to the parchment-lined sheet. If the chocolate firms too quickly, warm briefly in the microwave in 10-second bursts. Prepare the second color and decorate: Melt the remaining 4 ounces of white chocolate in a separate bowl using the same 30-second intervals. Add 3–4 drops of purple gel coloring and stir. Drizzle the purple over the green-coated truffles, attach one or more candy eyes while the chocolate is still tacky, and finish with Halloween sprinkles. Allow the coating to set at room temperature or refrigerate briefly to speed things up.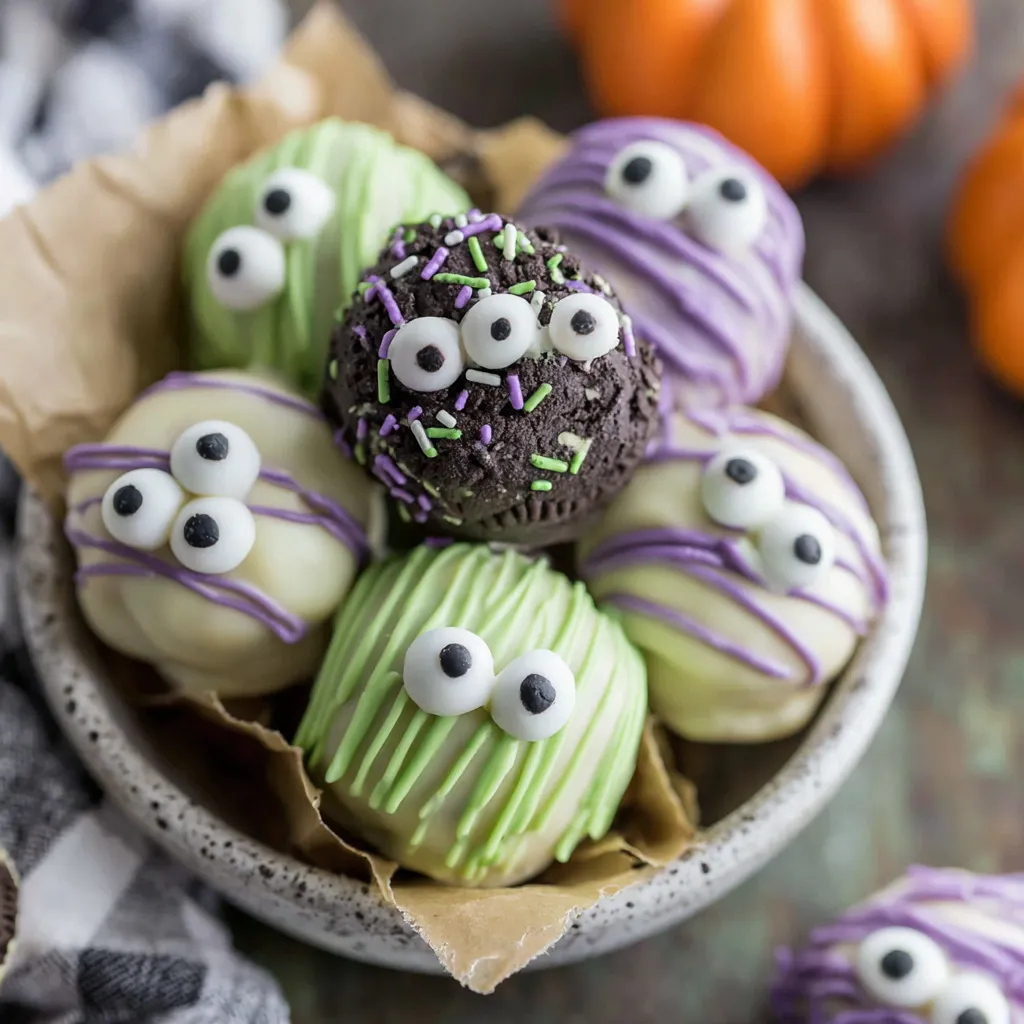
You Must Know
- These are rich — plan on 1–2 truffles per person as a sweet bite; the whole batch yields about 24 pieces.
- Store in an airtight container in the refrigerator for up to 7 days; they freeze well for up to 3 months when individually wrapped.
- Use gel food coloring only; liquid dyes can seize white chocolate and ruin the finish.
- Work quickly when dipping — chocolate will thicken as it cools. Keep a warm water bath nearby for the bowls if needed.
My favorite thing about these is how they bring people together. At a neighborhood fall festival, kids lined up to decorate their own monsters and adults kept stealing them from platters. The simplicity of the ingredients hides how impressive they look on a dessert table; a little color and a candy eye go a very long way.
Storage Tips
Store the truffles in a single layer in an airtight container. If stacking is necessary, layer parchment between tiers to prevent sticking. Refrigerate for up to 7 days; before serving, bring them to room temperature for 10–15 minutes to soften the interior slightly. For longer storage, freeze on a tray until solid, then transfer to a freezer-safe bag for up to 3 months. Thaw in the refrigerator overnight and bring to room temperature before serving. Avoid storing in warm places to prevent the coating from blooming or melting.
Ingredient Substitutions
If you prefer a slightly different texture, swap regular Oreos for Golden Oreos for a milder flavor or for gluten-free sandwich cookies if needed; note that texture and moisture may differ. Replace full-fat cream cheese with a lower-fat variety for fewer calories, though the centers will be less rich. For coatings, use candy melts if you like a sturdier, sweeter shell; they’re more forgiving than real chocolate. You can also flavor the coating with a teaspoon of vanilla or a pinch of salt to balance sweetness.
Serving Suggestions
Present these on a black or orange serving platter for an instant Halloween display; add pumpkin-shaped candies and edible confetti around the edges. Pair with hot apple cider or a spiced hot chocolate for an autumn dessert pairing, or place them on place cards as edible favors. For a buffet, arrange different colored batches in sections and include small tongs so guests can take them hygiene-friendly. Garnish with a sprig of rosemary or edible glitter for an elevated party look.
Cultural Background
While these no-bake truffles are a modern American take on chocolate confections, they draw inspiration from classic European bonbon-making traditions where a flavored center is enrobed in tempered chocolate. The Oreo-based center is a purely contemporary twist born from the popularity of sandwich cookies and the convenience of cream cheese as a binder. Decorating sweets with candy eyes and seasonal sprinkles is part of a long tradition of edible ornamentation tied to festivities and holidays, turning simple bites into thematic delights for celebrations.
Seasonal Adaptations
For other holidays, adapt colors and decorations: red and green for Christmas with crushed peppermint sprinkles, pastel coatings and tiny sugar flowers for spring, or orange and brown with toasted pecans for autumn. Swap candy eyes for small fondant shapes for a refined look. For summer gatherings, freeze the centers solid and dip them quickly to create a chilled treat that holds up outdoors on warm days.
Meal Prep Tips
Make the centers up to a week ahead and keep them in the fridge, or freeze for up to three months. Thaw in the refrigerator overnight before dipping. Portion and freeze in a single layer on a tray to prevent sticking, then transfer to a resealable bag. When ready to serve, melt the coating and dip straight from the freezer to reduce handling time. This split-step method keeps day-of work minimal and makes entertaining much simpler.
These monster truffles are a little bit mischievous and a lot delicious — a recipe that’s as much about creativity as it is about taste. Whether you’re making them with kids, prepping for a party, or gifting friends, they’re an easy, joyful treat that lets you play with color and design while delivering a reliably decadent bite. Happy decorating, and enjoy sharing these spooky-sweet morsels.
Pro Tips
Use gel food coloring to tint white chocolate — liquids can seize the coating.
Chill the formed centers before dipping to prevent them from falling apart and to reduce handling time.
Work in small batches when dipping so the coating stays fluid and glossy.
This nourishing no bake monster truffles (halloween oreo balls) recipe is sure to be a staple in your kitchen. Enjoy every moist, high protein slice — it is perfect for breakfast or as a wholesome snack any time.
FAQs about Recipes
Can I make the Oreo crumbs without a food processor?
If you don’t have a food processor, place Oreos in a heavy-duty zip-top bag and crush with a rolling pin until they become fine crumbs. Mix with softened cream cheese in a bowl using a sturdy spoon or electric mixer until combined.
How long do the truffles keep?
Store in an airtight container in the refrigerator for up to 7 days, or freeze in a single layer then bag for up to 3 months. Thaw in the refrigerator before serving.
Tags
No Bake Monster Truffles (Halloween Oreo Balls)
This No Bake Monster Truffles (Halloween Oreo Balls) recipe makes perfectly juicy, tender, and flavorful steak every time! Serve with potatoes and a side salad for an unforgettable dinner in under 30 minutes.
Ingredients
Base
Coating & Decorations
Instructions
Crush the cookies
Place 24 Oreos in a food processor and pulse until fine crumbs form. If you don’t have a processor, crush in a zip-top bag with a rolling pin.
Mix with cream cheese
Add 4 ounces softened cream cheese to the crumbs and mix until a uniform dough forms, scraping down the bowl as needed.
Form and chill
Portion the mixture with a small scoop or 2 tablespoons into balls, place on parchment, and freeze for 20 minutes until firm.
Melt and color chocolate
Melt 12 ounces white melting chocolate in 30-second bursts, stirring until smooth. Add 3–4 drops green gel coloring and mix.
Dip the truffles
Dip chilled balls into the green chocolate with a fork, tap off excess, and return to parchment. If chocolate firms, rewarm briefly.
Finish and decorate
Melt remaining 4 ounces of chocolate, color purple, drizzle over truffles, add candy eyes and sprinkles while coating is tacky, and let set.
Last Step: Please leave a rating and comment letting us know how you liked this recipe! This helps our business to thrive and continue providing free, high-quality recipes for you.
Nutrition
Did You Make This?
Leave a comment & rating below or tag
@gusteen on social media!
Categories:
You might also like...

Fudgy Mississippi Mud Brownies
Ultra-fudgy brownies crowned with melty marshmallows and a glossy cocoa icing. A nostalgic crowd-pleaser that slices cleanly and disappears fast.

Buttery Pecan Pie Bars
Buttery shortbread crust meets gooey brown-sugar pecan filling in these quick, crowd-pleasing bars, prepped in just 10 minutes.

No-Crack Pumpkin Cheesecake
Ultra-smooth pumpkin cheesecake with warm spice, sturdy graham crust, and a foolproof, crack-free bake. Perfect with caramel and whipped cream.
Did You Make This?
Leave a comment & rating below or tag @gusteen on social media!
Rate This Recipe
Share This Recipe
Enjoyed this recipe? Share it with friends and family, and don't forget to leave a review!
Comments (1)
This recipe looks amazing! Can't wait to try it.
Comments are stored locally in your browser. Server comments are displayed alongside your local comments.

Hi, I'm Charlotte!
What's Popular

30-Minute Meals!
Join to receive our email series which contains a round-up of some of our quick and easy family favorite recipes.